The Ultimate Scrapy Python Guide: Web Scraping & Proxy Integration
Large-scale web scraping is a challenging task that becomes much easier with dedicated tools like Scrapy. Scrapy is an open-source Python framework that is currently one of the most popular solutions for gathering online data. Its asynchronous architecture ensures speed, and you can add middleware for customization.
Collecting large quantities of information often requires a layer of online privacy. In this Scrapy tutorial, we will illustrate how it integrates with proxies and other anti-detection tools, like user agent rotation. If you are just learning to scrape the web, visit our Python web scraping guide, as the Scrapy framework is built in this coding language.
Otherwise, let's see how you can start your Scrapy project, from setting it up to troubleshooting the most common issues.
Setting Up Scrapy Python
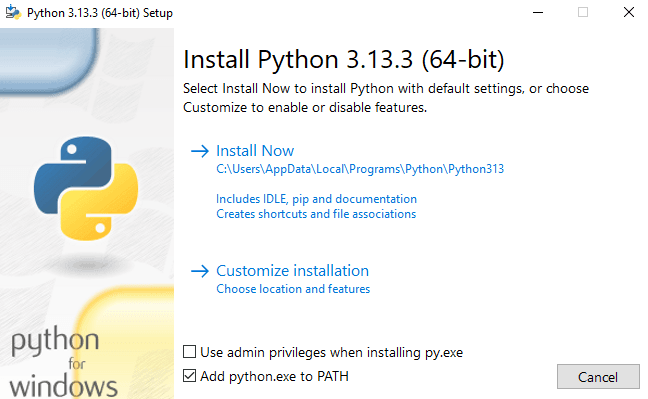
Firstly, you have to set up a development environment, starting with Python, which you can download from the official website. This tutorial is written for the Windows operating system, so we will be using its Command Prompt to execute commands. Currently, the latest Python for Windows version is 3.13.3.
When installing, don't forget to check the 'Add python.exe to PATH' checkbox to allow executing its commands in the Command Prompt, as seen in the image below.
Then, launch the Command Prompt and type
pip install scrapy
Wait for a short while until your Command Prompt displays that all packages were installed successfully.
Now, you can start the Scrapy project using the
startproject project_name
command, where project_name is whatever you will call it. We'll name ours ScrapyTutorial. If successful, the Command Prompt displays the commands to start your first spider (not to be confused with web crawling, which is sometimes called spidering), which is a specific Python class that defines web scraping rules.
At this point, Scrapy has created a directory with the following structure.
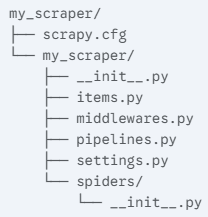
The scrapy.cfg file stores your project settings. The gathered data structure is defined in the items.py, while the pipelines.py controls how collected information is processed. The spiders directory stores all files regarding web spiders. This organized Scrapy project structure makes navigating and making changes to it particularly easy.
Now, you can generate your first spider. First, go to your projects directory in the Command Prompt by typing
cd project_name
with the name you gave it before. Proceed with the
scrapy genspider SpiderName Example.com
command, where SpiderName is how you call your spider and the website you scrape after that. Make sure your spider name is not the same as your projects.
In this example, we created a Scrapy project spider called Mars to scrape our website.

For now, we are done with Command Prompt but don't close it, as you will need it shortly. At this point, it has created a new file called 'Mars' in the 'spiders' directory, which is located in 'C:\Users\Username\ScrapyTutorial\ScrapyTutorial\spiders' in our example.
Navigate to your directory and open this file, but remember that using Python as a launcher will not work because you need to work in the Scrapy framework. You can open this file with a simple Windows notepad, but using a dedicated IDE (integrated development environment) is better. We will use Microsoft's Visual Studio Code.
Right-click on your spider file, then choose 'Open with' option, and select your IDE or a simple notepad. Here's what we see:
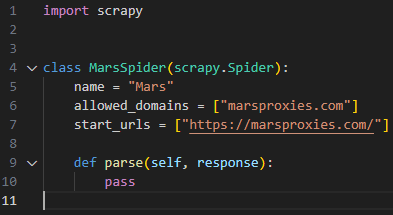
This is a very straightforward example. It defines that we will be using a Scrapy spider to scrape the 'marsproxies.com' website, and that it is the only domain we allow it to scrape. Defining 'allowed_domains' is essential to prevent your scraper from mistakenly grabbing unintended data.
Lastly, the parse(self, response) is a call-back function that Scrapy will execute after completing previous steps. Because we have not defined any specific rules, it will collect the whole HTML document of our website.
Extracting Data With Scrapy
Later on, we will show how to specify parsing rules to scrape data using CSS selectors, where the real web scraping magic begins. In your IDE, you will write more code that defines what, how, and where your Scrapy project collects information. Remember that you are not using Python to execute this code but utilize the Scrapy framework command-line interface (CLI) from Command Prompt.
Let's execute our basic spider using the Scrapy crawl function. Go back to the Command Prompt and make sure your directory is still set to the Scrapy project (it was done via the 'cd project_name' command a few steps earlier.) Then, type
scrapy crawl SpiderName
and input your spider's name you created a few steps back.
After executing the command, you will see a long list of functions that Scrapy performed, finishing with the 'INFO: Spider closed (finished)' statement. This means that it successfully grabbed targeted data. However, notice that the Command Prompt is not displaying any actual content. That's because we have a 'pass' statement at the end of the parse callback function. In your IDE, add the following line after the 'def parse(self, response)':
print(response.body.decode('utf-8'))
The last line instructs Scrapy to display the HTML content and use UTF-8 standard to decode the data from bytes (which are binary 0 and 1 values) to human-readable language. See the picture below for the results.
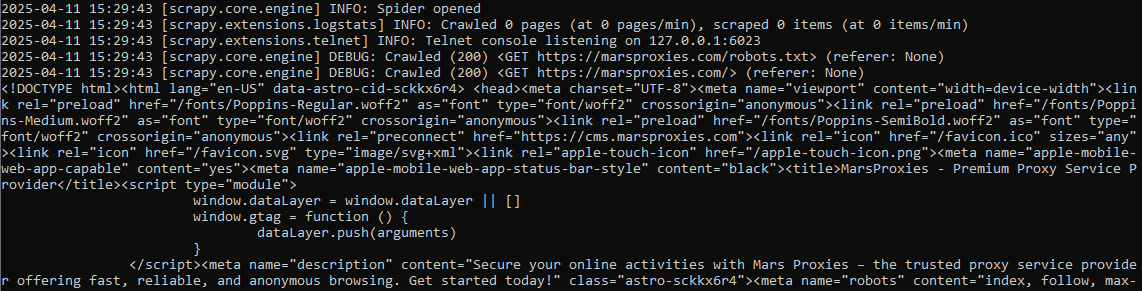
After completing initial processes, notice the Command Prompt displays the <!DOCTYPE html> and then the website's content. Because this data is unparsed, it shows all the complexities of an HTML document. Now, let's see how to narrow it down using CSS selectors.
While web scraping with Python, you will frequently rely on the developer's tools to specify targeted data. Once you have the website opened in a browser, click ctrl + shift + I or right-click on the website window and choose 'Inspect.' It will open the developer's tools and display the website's HTML code.
At his point, it is highly beneficial to have some JavaScript coding knowledge, as this is the most popular website development programming language. Alternatively, we recommend familiarizing yourself with the basic HTML and CSS structures, but chances are high that you will run into more complex JavaScript functions shortly.
Now, we'll show you how we used CSS (Cascading Style Sheets) selectors to extract pricing information from our front page.
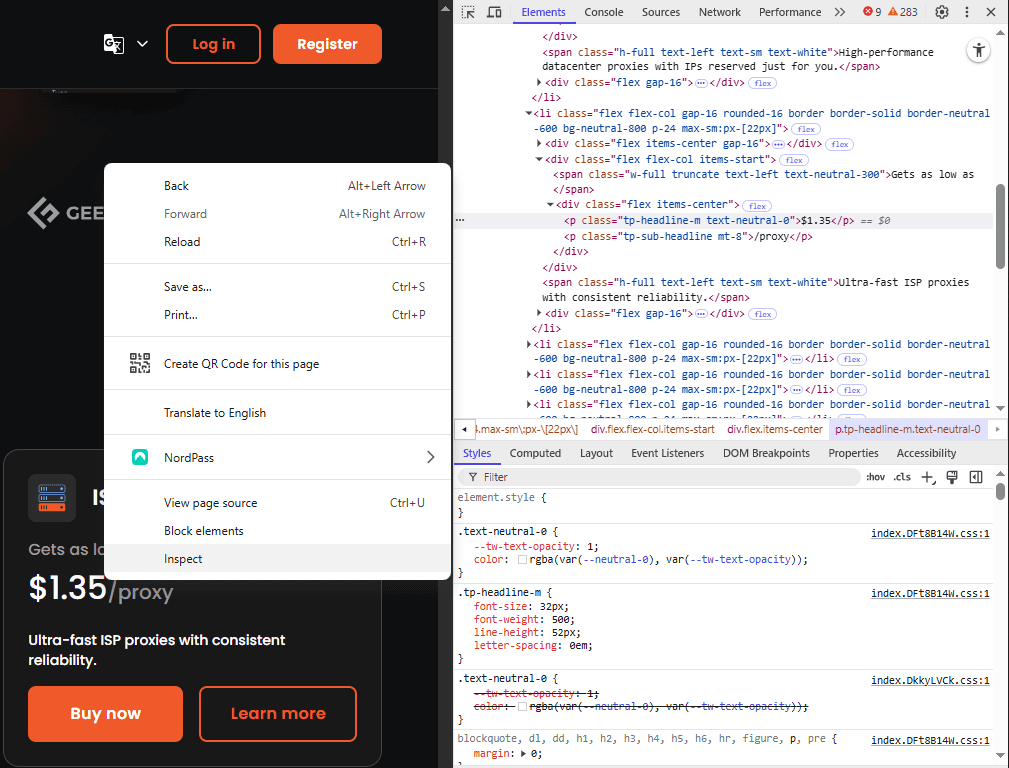
We have right-clicked and inspected the pricing element, and the HTML code is displayed to the right. As you can see, the pricing is stored within the HTML paragraph <p> element and has classes named 'tp-headline-m' and 'text-neutral-0'.
<p class="tp-headline-m text-neutral-0">$0.22</p>
After looking up the classes in the HTML code, we found that these classes are attributed to all pricing elements, so we can use CSS selectors to extract them. We then add the following code in our IDE under the 'def parse(self, response):' line:
			pricing = response.css('[class="tp-headline-m text-neutral-0"]::text').getall()
 if pricing:
print("Price details:")
for price in pricing:
print(f"- {price.strip()}")
Firstly, we define that the pricing details are the Scrapy response object, which your spider will fetch. We outline that we will be using a CSS selector to grab elements that have classes 'tp-headline-m' and 'text-neutral-0'.
Because our pricing elements are defined only by these two classes, we also instructed Scrapy to target elements with an exact class match. That is, targeted elements should only have these 2 classes attributed as a string. The :text instructs to grab the text content directly, that is to simply copy what's between the <p> and </p> tags.
Then we inform Scrapy to get all results with the following classes and finish with an if statement, which looks for all elements matching defined criteria. Lastly, we instruct it to print the values using a formatted string, which displays pricing values starting with the '-' symbol. Here are our results:

Now, instead of the hardly readable HTML code, Scrapy displays an organized list of all pricing elements, successfully capturing all six. However, notice the 'Join Our Discord Community' statement in the end. Although we invite you to drop by our Discord server, it shouldn't be included in our Scrapy project results.
Scrapy also grabbed this element because it also has the exact same two classes attributed to it in a string.
<p class="tp-headline-m text-neutral-0" data-astro-cid-m3jmx4ij=""> Join Our Discord Community </p>
We want to show you how important it is to use CSS selectors accurately. If you target a class that is attributed to dozens of different elements, you risk grabbing an unnecessarily large dataset, which you have to narrow down manually. Instead, spend some time learning the HTML and CSS structures to specify targeting as much as required.
Using XPath Selectors
There are numerous alternatives to CSS selectors, and XPath is one of the more popular ones. This query language lets users fetch data according to content position, element hierarchy, attributes, and specific conditions.
For example, Xpath offers keywords called Axes that target data based on its position relative to other elements. You can imagine it as movement through the HTML document, which is expressed through the 'axis-name: :node-test' format.
Axis is your direction from the starting point, like a child or parent element (which is how HTML structures hierarchy relations). Meanwhile, node (most often an HTML element) is what you're looking for, like <p> and <li> elements. XPath syntax uses the / symbol, so a simple XPath code line looks like this:
//*/parent::p
The // selects all elements in the document all the way down from the root. The * wildcard instructs to select all nodes wherever they are in the document. The third / informs that we are targeting all parent elements, and the p, in the end, means we are looking for paragraphs.
In other words, this expression looks for all paragraphs that are immediate parents of any elements in a selected document.
Handling JavaScript & Dynamic Content
JavaScript elements make websites interactive and dynamic. However, that poses web scraping challenges that Scrapy struggles to overcome. Scrapy is primarily used to scrape static HTML documents and does not render JavaScript elements embedded there.
JavaScript can load data from APIs, like pricing information or weather forecasts. Because Scrapy does not execute this code, it fails to grab data that appears only after JavaScript execution. Simultaneously, some content may appear only after user interaction, like scrolling or clicking a button.
That demands a Python script solution that can simulate human actions and execute JavaScript code. Let's overview two efficient tools that solve these Scrapy web scraping shortcomings: Selenium and Playwright.
Selenium
Selenium is a robust framework that automates web browsers. It is a highly valuable web scraping tool that allows fetching data that requires human interaction, like logging in or clicking a button. It is compatible with multiple web browsers and programming languages.
Scrapy and Selenium are different tools that work together very well. After all, what is Scrapy without powerful add-ons that enrich it with more features? Whenever you scrape a website that's loaded with JavaScript, you can delegate it to Selenium using Scrapy middleware integration, typically through Scrapy Downloader Middleware.
Playwright
Microsoft developed Playwright for web application testing, but it is also widely used for scraping. Similarly to Selenium, it is also used to automate web browsers. It automatically waits for the website to load fully before scraping it, so you don't need to write code for that.
Its Scrapy integration is done the same way as Selenium. Playwright has more limited browser support, but it is also generally faster. It is relatively easy to learn but also has a more narrow coding language support.
Using Proxies in Scrapy
Many website use anti-scraping protection. Some want to prevent collecting user data, while others worry about scrapers slowing them down. You will also often encounter Cloudflare's web scraping protection, like CAPTCHAs or IP address restrictions. That's where proxies come in.
Whenever you generate and use Scrapy spider following the instructions above, it collects data using the same IP address. You risk detection and IP ban if you don't rotate IPs regularly. For that, we offer over a million residential proxy IP addresses with customizable automatic IP rotation.
We offer 5 types of proxies suitable for web scraping. Take a look at the table below for their use cases and benefits.
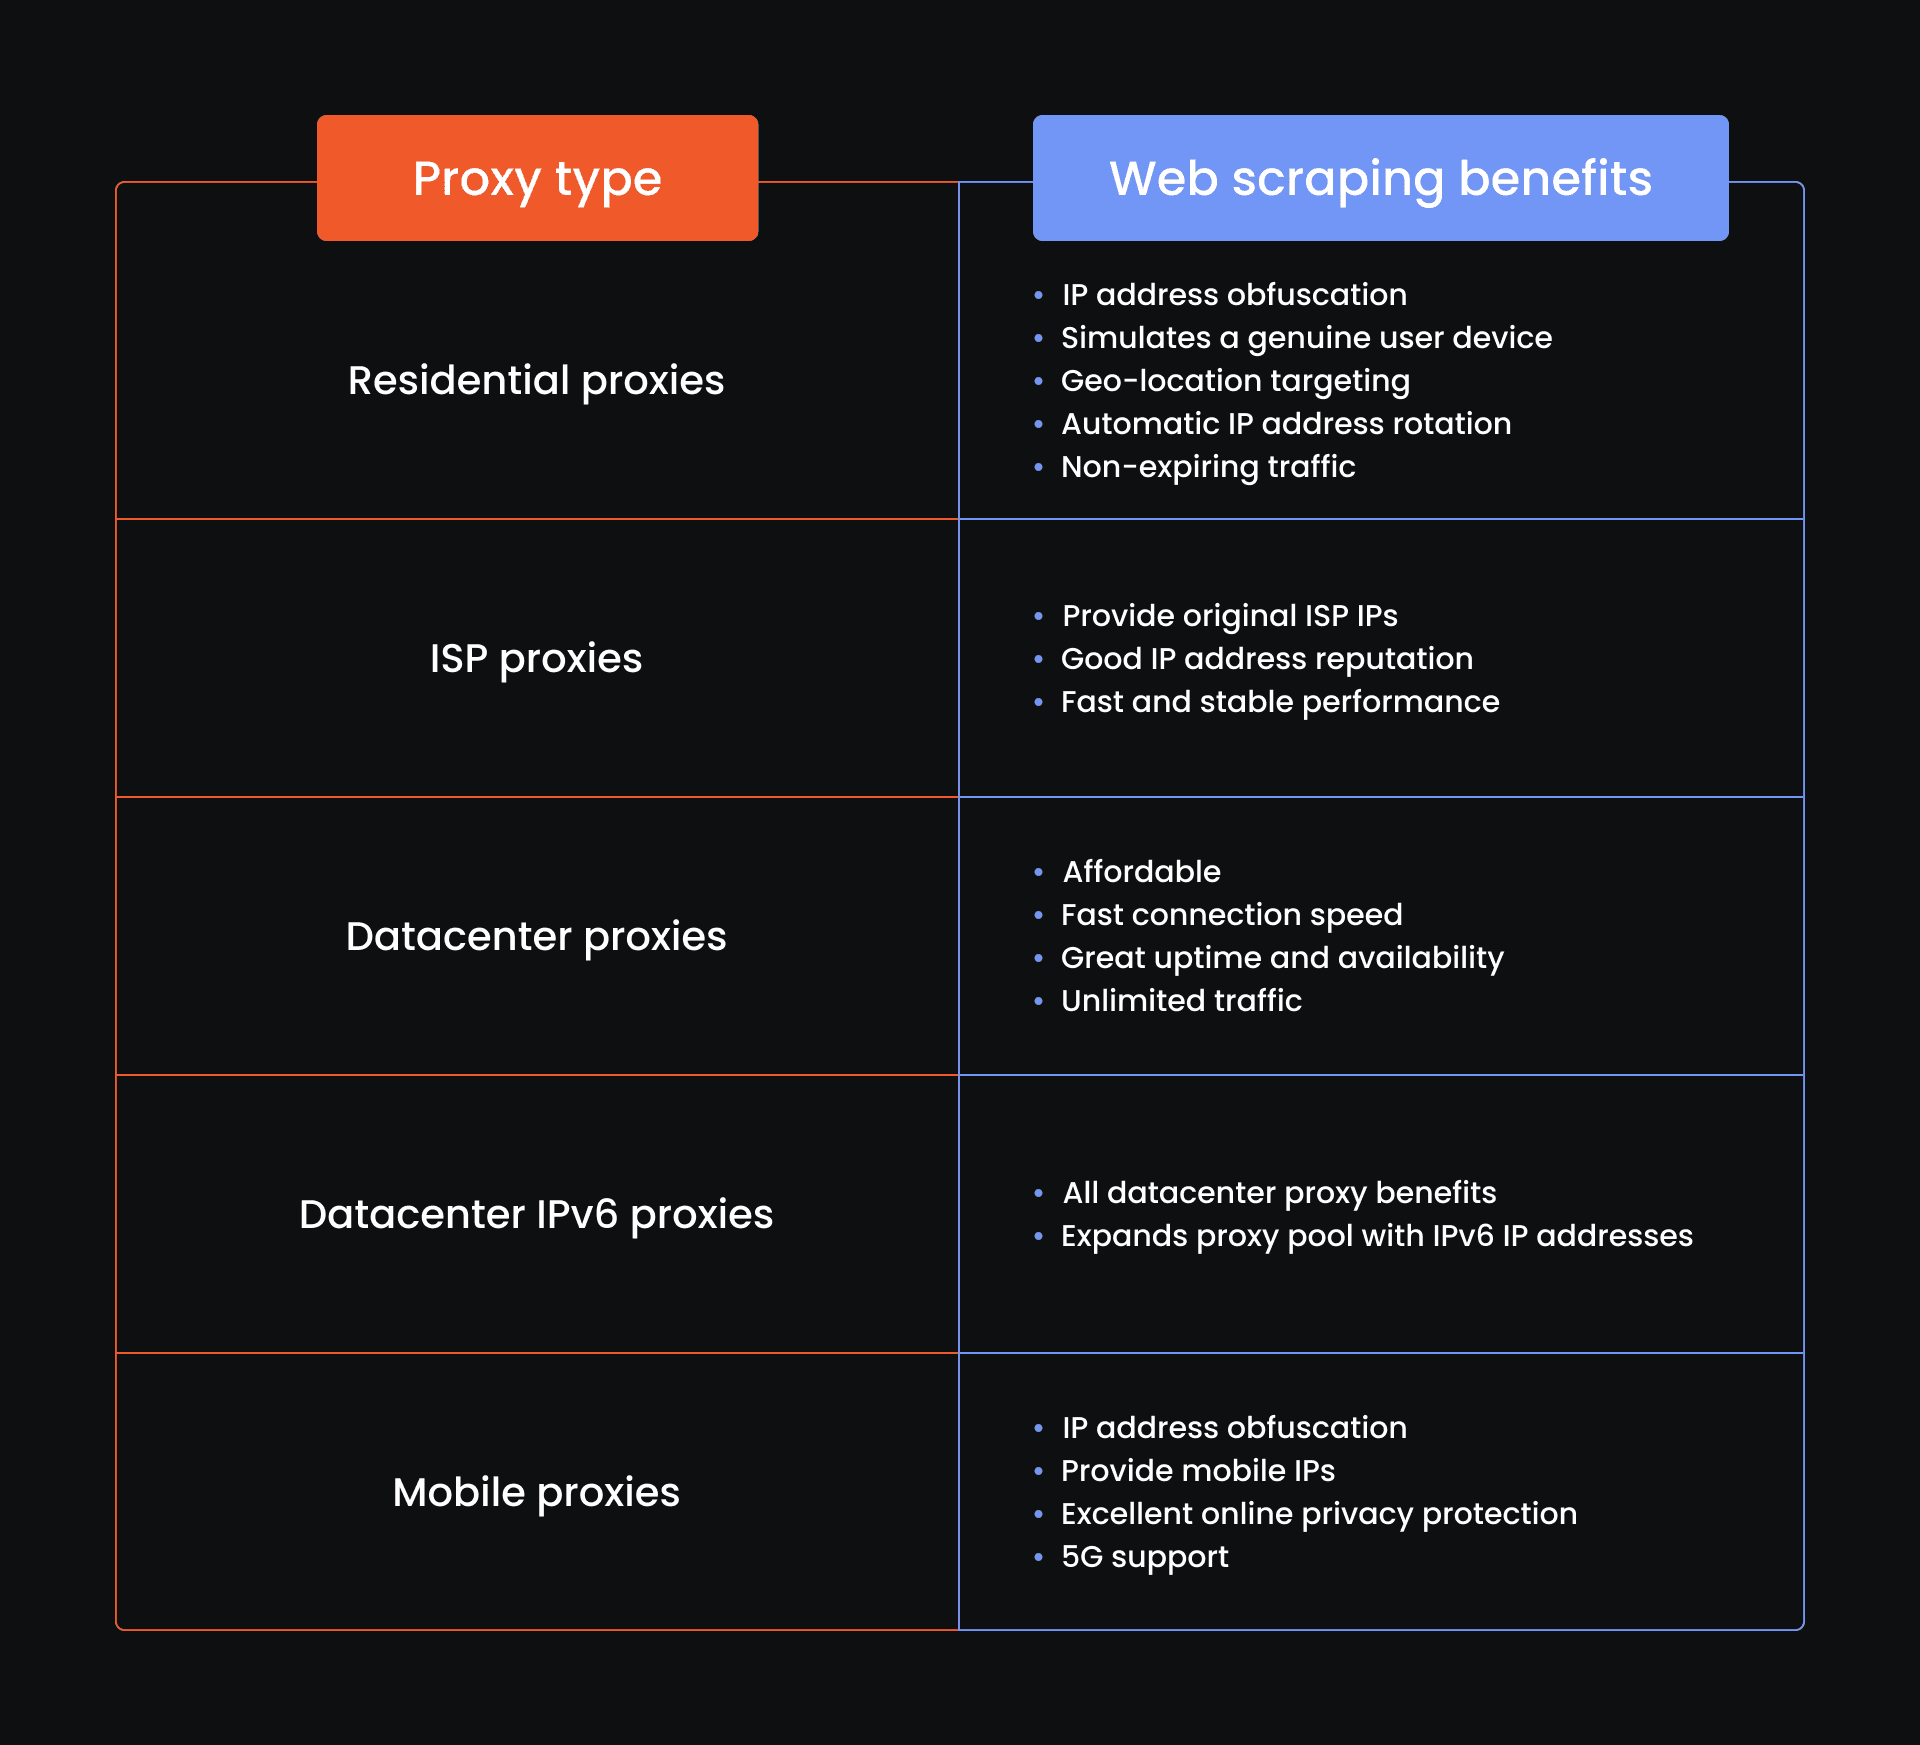
Each proxy type suits different web scraping needs. However, residential proxies are particularly popular due to their excellent online anonymity features. Let's see how to deploy them in a Scrapy environment.
Scrapy Proxy Setup
There are two ways to set proxies up in Scrapy. In this article, we will use a simpler and more manageable method and leave the manual and more customizable setup for another time. Start by opening Command Prompt and type:
pip install scrapy-rotating-proxies
Then, you must insert proxies to the settings.py file in your Scrapy project directory. Navigate to this directory and open the settings.py in your IDE. Insert the following code:
ROTATING_PROXY_LIST = []
We will use a residential proxy in Denmark with a sticky IP address as an example. You will have to do the same using your proxy details. Here's how it looks in our example:
ROTATING_PROXY_LIST = [
'http://mr10478lWc5:MfW4bYnUPd_country-dk_session-4seo4wht_lifetime-12h@ultra.marsproxies.com:44443',
]
Then, you have to enable rotating proxies and ban detection middleware. Add the following code below:
			DOWNLOADER_MIDDLEWARES = {
'scrapy.downloadermiddlewares.httpcompression.HttpCompressionMiddleware': 810,
'rotating_proxies.middlewares.RotatingProxyMiddleware': 610,
'rotating_proxies.middlewares.BanDetectionMiddleware': 620,
}
Finally, save the settings and use the 'scrapy crawl' command in the Command Prompt as we did before. In our example, we see the following lines in the Command Prompt:
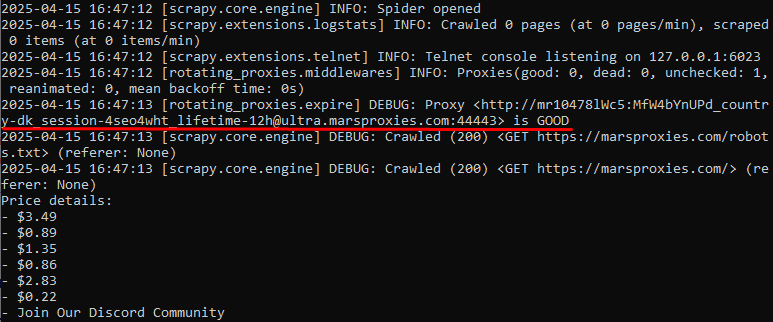
We have highlighted the essential part, where the Command Prompt verifies that the connection to the proxy server has been successful.
You can always add more proxies in the settings.py file to rotate IPs and evade detection and bans. With this configuration, your Scrapy project can scrape the web without exposing your original IP address.
This finalizes the practical Scrapy Python tutorial part. But to dot all i's and cross all t's, let's briefly overview other anti-detection techniques and common Scrapy error fixes.
Anti-Detection Techniques
IP obfuscation is not enough to mask your scraping requests entirely. You must also rotate user-agent strings, manage sessions, and use delay.
User-agent Rotation
With each request, your scraper sends a user-agent string, which is used to identify the browser and the operating system. Here's an example of a random user-agent string:
Mozilla/5.0 (Windows NT 10.0; Win64; x64) AppleWebKit/537.36 (KHTML, like Gecko) Chrome/115.0.0.0 Safari/537.36
It indicates that the request comes from a 64-bit Windows 10 operating system that uses the 115.0.0.0 Google Chrome version.
Even if you switch IPs, websites can identify multiple scraping requests by inspecting the user agent strings. Luckily, you can rotate user agents by modifying the settings.py file, similar to our IP rotation example. Due to the limits of this article, we will provide the exact workflow in a dedicated blog post.
Session Management
Session tracking is another method to identify users. You must have noticed websites asking to accept cookies, which store user data. For example, whenever you log in to Facebook, it stores your credentials in a cookie if you allow it. Next time, you don't have to input your credentials, and Facebook opens the account inspecting the cookie.
Using a different cookie and IP address for each targeted website decreases detection and ban risks significantly. Scrapy enables the CookiesMiddleware by default to efficiently manage session cookies. It uses the so-called CookieJar, which developers can manipulate to strengthen anti-detection.
Using Delays
One of the simplest web scraping detection methods is to monitor data request frequency. Scrapers can request data much faster than humans, so it's an obvious giveaway of automated Python script. To fix this, you must simply add
DOWNLOAD_DELAY = x
code line to your settings.py file, where x stands for the delay in seconds. Your scraper will make longer breaks between data requests to mimic human-like behavior.
Common Scrapy Errors & Fixes
Development is a lot about identifying and fixing errors, and web scraping is no different. Here are some of the most common Scrapy proxy errors and their fixes.
407 Proxy Authentication Error
You may encounter this error if you use proxy server that require authentication. Our proxies use the hostname:port:username:password format. Take a look at a proxy server we used for this article:
ultra.marsproxies.com:44443:mr10478lWc5:MfW4bYnUPd_country-dk_session-lafwx1xh_lifetime-12h
However, Scrapy requires it in the http://username:password@proxy_host:proxy_port format. That's why we have modified it in the settings.py file to look like this:
http://mr10478lWc5:MfW4bYnUPd_country-dk_session-4seo4wht_lifetime-12h@ultra.marsproxies.com:44443
If you don't format it properly, Scrapy fails to authenticate the proxy, and you will see a 407 Proxy Authentication Required error in the Command Prompt when you crawl a website.
Proxy Downtime
Residential proxies use a genuine person's device as a proxy, which can experience downtime if they move outside of the internet connection zone. This time, you will encounter a 'Failed to connect to proxy server' or 'Connection refused' error.
Firstly, verify that you have input the proxy string correctly without a single mistype. If that's the case, go to our free Online Proxy Checker and paste your proxy string. You should have a status code 200 if the proxy server is operating. Otherwise, choose a different proxy server and reconnect to it.
403 Forbidden
This is a common error that says you do not the permission to access specific data, even though the connection to the server was successful. Your IP address may be blocked, or the website may identify scraping via user agents.
In this case, consider additional online privacy protection methods. We have discussed the IP and user agent string rotations and the importance of HTTP request delays, which can solve this issue.
Final Thoughts & Next Steps
Scrapy and proxies are a powerful combination to scale web scraping. Scrapy's asynchronous architecture supports multiple concurrent requests to target multiple websites simultaneously. Meanwhile, proxies provide IP addresses to avoid detection and bans.
After you master Scrapy, we recommend learning additional tools, like Selenium or Playwright. They enable targeting JavaScript-heavy websites and improve data collection scope and accuracy.
Simultaneously, keep in pace with the latest scraping protection methods. Professional IT security businesses like Cloudflare regularly update their website protection algorithms, which sometimes interfere with ethical web scraping requests. Lastly, we recommend visiting our web scraping guide if you want to learn about more tools and techniques.
Is Scrapy better than Beautiful Soup?
The Python Scrapy vs BeautifulSoup is not a better-or-worse comparison, as these are tools with separate purposes. Scrapy is a framework to build web scrapers, while BeautifulSoup is a Python library to parse XML and HTML content. These two tools go hand in hand seamlessly.
Is Scrapy better than Selenium?
Selenium is an excellent browser automation tool, so comparing it to Scrapy in better-or-worse terms isn't efficient. We recommend using Selenium for scraping dynamic websites rich with JavaScript elements. Meanwhile, Scrapy excels at scaling the scraping tasks.
What are the limitations of Scrapy?
The most apparent Scrapy limitation is JavaScript support. This framework does not execute JavaScript code, so it fails to grab data that are displayed only after the website loads fully or information displayed via API.